Sunday, November 9, 2014

Plants update

So we started the first seedling 2 months ago now, and I had to add some more in the meantime, but here are what we have now:

  • Basil (from seeds),
  • Thai Basil (from cloning),
  • Tomatoes (2 from seeds, 1 from clone),
  • Red Lettuce (seeds),
  • Bok Choi (seeds),
  • another Chinese cabbage (seeds),
  • Strawberries (seeds),
  • Winter Squash (seeds).


Basil is really easy. As you need to prune it regularly, keep the heads in water for a few days, and will make some roots. You can plant them to grow new plant.
I got 2 tomato plants: the leaves curled and got flaky... then died. The other two were nice ! 
The squash is amazing ! It drinks a lot of water, but still so funny to see it growing.
Strawberries are the slowest... of the seeds that came out, because Coriander never sprouted !
Lettuces are quite weak, and they tend to die with the wind. I'll try other species.


Saturday, November 8, 2014

First test with Moteino's & Raspberry Pi running TheThingBox

So we're getting close the the architecture we'll be running. It is based on Moteino nodes (Arduino compatible with RFM69W) talking to a gateway based on a Raspberry Pi running TheThingBox (Raspbian, Node.js, Node-red, Mosquito).

First I used LowPowerLab codes for the nodes and the gateway Moteino. There are two moteino loaded with node firmware transmitting text strings over encrypted radio (915MHz) to a gateway Moteino. The gateway is plugged thru USB to the Raspberry Pi.


TheThingBox is quite easy to operate: download, install on the SD card, plug it, and turn on. Voilà ! A simple sketch is loaded in the sheet: serial input to debug.


And on the right side, you can see the text string sent by the Moteino node is now displayed on the debug window on the right side.
The only tricky part is to get the right serial port of the Moteino connected to your Raspberry Pi.

  1. Log on your Pi thru SSH
  2. Type ls /dev/tty*
  3. Plug your Moteino USB or Moteino with FTDI adapter
  4. Type ls /dev/tty*
  5. Compare the two results, you should have a new TTYUSBx listed
This is the value you'll put in the serial config of the sketch.

Tuesday, November 4, 2014

Moteino are in the house !

So after researching online which node I would use for the sensors/actuators network, I first had a look at the Jeenodes as they are quite popular and cheap. The main issue today is that they are using a RFM12B radio module from HopeRF, and this part number have been phased out last year. The replacement unit is the RFM69W, which is not yet supported by Jeenodes. So far, the best developments made around the RFM69W/HW and Arduino comes from Felix Rusu of LowPowerLab: the Moteino.

As it was designed to be a wireless node, the RFM69W is directly soldered on the Moteino pcb and there are different options for antennas (no antenna, 1/4 wavelength wire, SMA connectors, etc.)
There is no FTDI chip on it to save space and also costs.

For the gateway, you need a Moteino USB as this one has to be permanently powered, the USB connectivity & power feed is a better solution.


I also took a Power Shield as it drives & charge a LiPo battery and provide juice for the node. Once assembled with a cheap HK$45 LiPo pack from Sham Shui Po, it looks nice !
Now the tests. Once the library installed, there is an exemple for the node, and one for the gateway. The gateway still plugged to the computer, and you open the Serial monitor inside Arduino IDE, and the strings start to be transmitted.

The range is more than what is needed, but it will help to have a wireless connection between the sensors (pH, Water Temperature, Air Temperature, Humidity, Light, EC, etc), the actuators (pH up, pH down, Nutrients A, Nutrients B, Water), and the controller (Raspberry Pi with IoT software).


Sunday, November 2, 2014

Installing the perilstatic pumps

I've bought 5 perilstatic pumps on Taobao from Kamoer (KPP-S06-DG-C0). They are quite cheap and the only drawback is, like all perilstatic pumps, the tube has to be changed every 6 months or so. You better order some silicon tubing at the same time.


The big clear IKEA Trofast container that was helping algae to develop will now be used as the solutions storage. An additional small Trofast will get the pumps.

I've drilled 5 holes (30mm diameter) in zig-zag (4 cm far from each center, the two lines are 2cm far from each other).
5 holes will be drilled for the silicon tubes to reach the bottles stored underneath. And one more for the wiring. I'll put the electronic board with the TIP120 transistors and the Arduino in that level too. You'll need another hole to reach the motor poles.
I've selected 12V pumps because I'll have the solar panels feeding a 12V battery system, so it's much simpler that way.


The system can add pH+, pH-, nutrients A, nutrients B solutions to the circuit. One water jar will be added to the system to flush or add water to the circuit.
The flow of each pump need to be calibrated as it depends on the section of the silicon tube. So for the water jar, you better have a bigger section (-S10).
Maybe I'll add the batteries for the solar panels in that tank too.


Wednesday, October 22, 2014

Getting off the grid

Since hydroponics run on power for the water pump, and the air pump, if you want to go further close to the real deal, you could grow your food without consuming more power than a natural setup would do.
Many grower around the world have Solar Panels setup to run their pumps and control units. And being near Shenzhen where a lot of things are manufactured, gave me the opportunity to get some panels.


But we got a balcony,  not a garden or a terrace. And worse, the exposition is not full South, but more West. So I have to get the maximum yield of that sun exposure. So I selected custom made flexible panels (flexible and easy to install). After communicating with an "manufacturer"/integrator, they could provide 4 custom made panels of 15cm x 92cm. So 3 of them would fit the big length, and one the short return. Why the flexible Sunpower cells ? Because they are made for RV or Boat rooftops. So they "like" not to be oriented or angled to south or 90° angle sun rays.


 You can order these panels with front or back power connection. They are all equipped with MC4 connectors, so it's easy to daisy chain.
 4 panels will give 17.4 V. Perfect voltage for my MPPT solar charger.


Tuesday, October 14, 2014

Calibrating the perilstatic pump

 So I received the pumps ordered on Taobao. As many forums gave various feedback on these pumps I decided to calibrate them.

In fact, for the experience, I added a cooking scale under the receiving tank and measure the water weight... as 1cc = 1 gram, it is quite easy to measure !

I ran some tests and finally, 60s equal 30cc. Easy, eh ?

To drive the pump, it is quite easy: a single TIP120, a 1K to 3.3K resistor and a power supply. Schematics & explanation can be found here.


Using a simple diagram to drive them with the Arduino, I ran the pump for a minute and measure the amount of water that have been moved from one container to another.

Saturday, October 4, 2014

Structure modifications

The first modifications were to replace the clear tube between the Trofast boxes.
Instead of a direct drop to the next bucket, I used a 15mm PVC tube with a interconnect. The interconnect has a threaded male part than goes thru the Trofast, and we screw the female part on top of it. The height of that female part is perfect as the water level is just in contact of the netpots bottom.


The bottom of each dropdown tube is glued with hotglue gun and I drilled 6 holes to make some kind of shower head. The tube is just plugged into the interconnect.

Under the dropdown tube, I now have a bell with holes to prevent clay pebble to enter the tube and get stuck at the bottom. As they are bigger than the holes, the flow was restricted and I had the installation flooding the balcony.
You need a lot of holes, and they have to be under the water level. Drill also the top of the bell otherwise the syphon effect will empty the whole bucket.
I've also added more shelves on the right side. But they are not running yet.
As the tomatoes need more heights I can now leave them on the right side and have some room for the leaves.
 After a few weeks, I had a algae invasion, all the clear aquarium tubes became coated with green and the tank turned green. So I filtered the water and removed the clear tubes.


I now use the frame PVC tube to feed the water to the top, so I added a T near the tank, with a treaded adapter and a water hose brass male plug. The aquarium pump is now feeding the system thru a 30cm soft tube and then it goes to the top in the PVC frame.

Sunday, September 7, 2014

Seedlings !

Ok, we got the structure almost done, the water pump is in the bottom tote, and the air pump is tied to the frame, so it is time for something to grow ! As I wanted to start from seeds, I bought some CocoPods. These are compressed Coco discs that expand in the water.

Check my friend's website to see how to handle lettuce seeds as they are tiny tiny.

 The 2-3 first days, it is better to hide the seedlings from light. The lid is great as it keeps the humidity level high (it is quite rare to have super dry weather here in Hong Kong anyhow).
When the seedling are well developped, and the roots are going thru the pods/foam, they are ready to transplant in the netpots.
Seeds don't grow at the same speed, so transplant only the viable ones...
The Typhoon killed my first batch by bending the stems...

Saturday, September 6, 2014

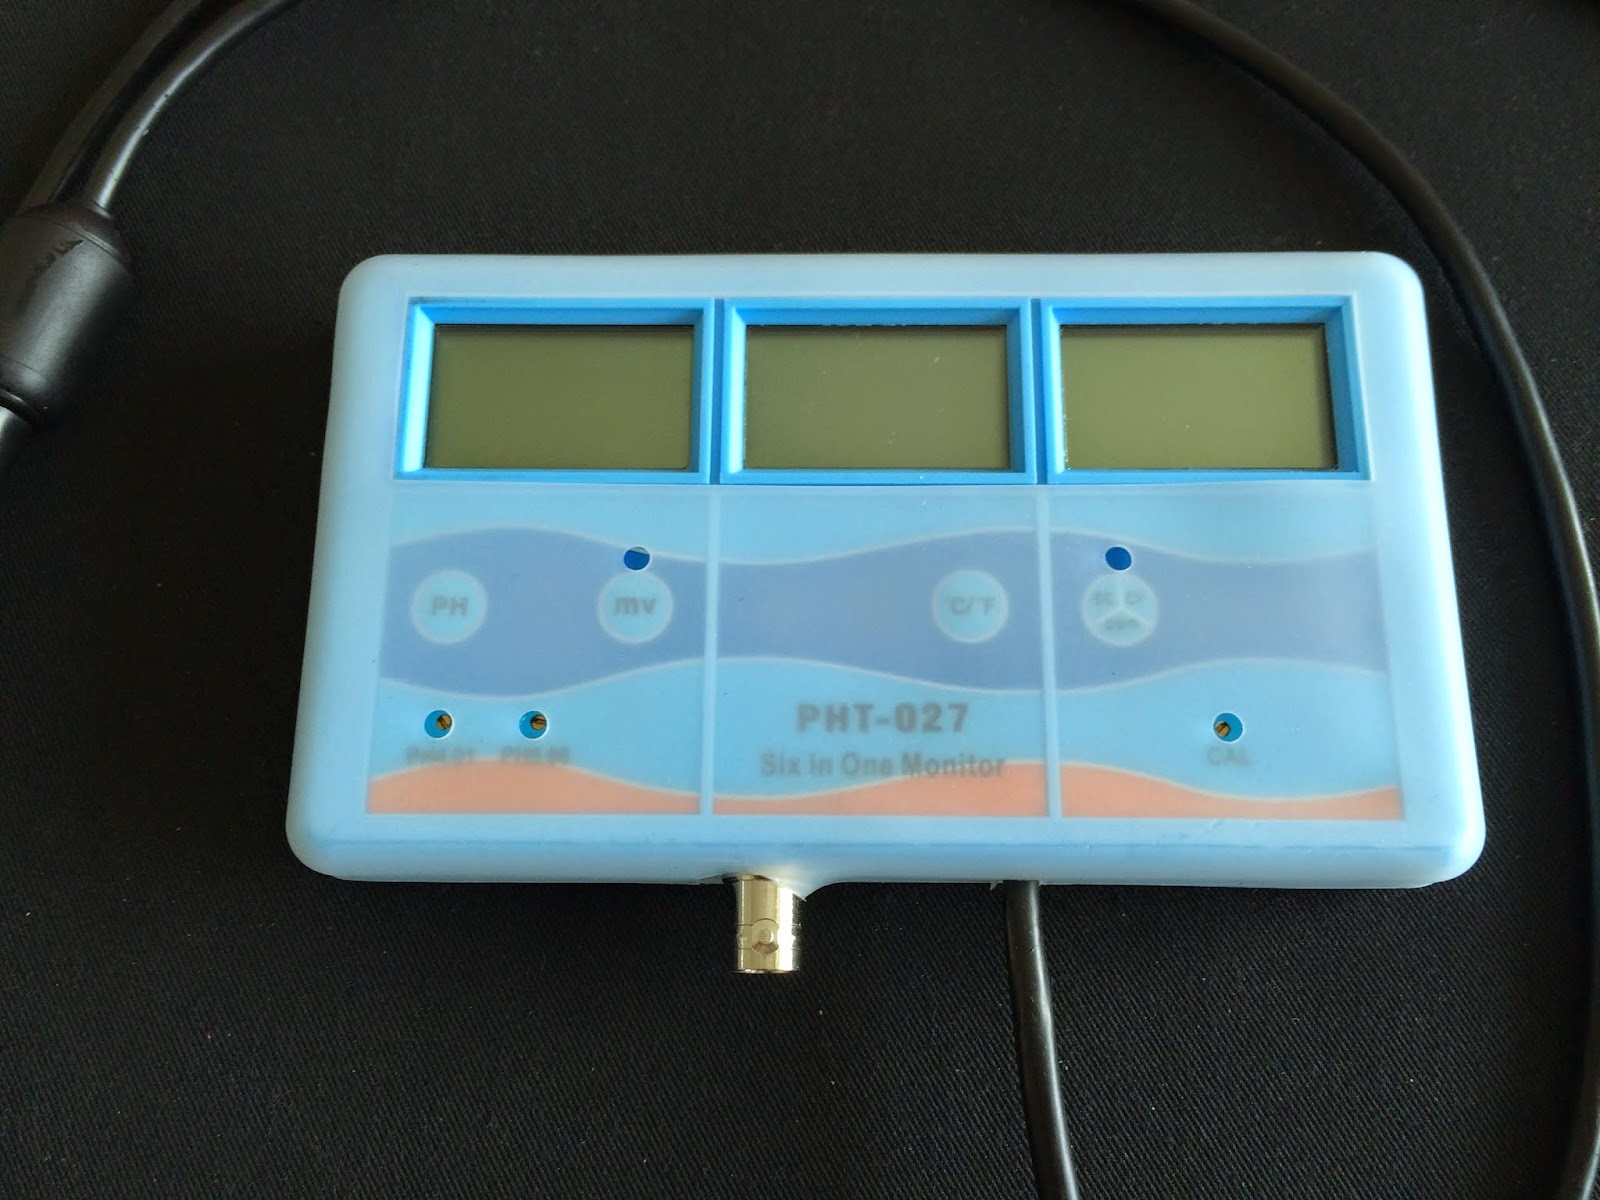
7-in-1 water meter... that displays only 3 parameters !

After some research on AliExpress & Taobao for some pH & EC meters, I finally found a unit that was quite cheap and provided pH, EC & Temperature reading. 

I even found a voucher to get 5% on their "original" website


The unit is quite compact and is delivered with an ORP probe, but as there's only one BNC socket, it is either pH or ORP...

And we can't count °F & °C as different features.

Wednesday, September 3, 2014

The structure

 Instead of using a wood plank and a shelve system from IKEA, I decided to go with a PVC tube frame. We have plenty of little hardware stores in Hong Kong, so sourcing the PVC tubes are easy and close to your home.
You can see on that picture that I have a clear white storage tank... that will help to develop algae :( Black is the way to go.

The only tools you need are a tape meter and a saw.

As the green tote is 42 x 30 x 10, the front bars are 40cm and they are made of 1/2" tubes... The side tubes are 26cm. Now I realised that I should have used 25mm tubes, as metric tubes are easier to source than imperial. 4 Ts per  shelf, 4 Ts for the base, and another set of 4 Ts for a link between the front and the back ladder to keep the structure together.


I found the PVC frame easier to modify and adapt to your needs. For exemple, I started with a single column, and then I thought that I needed an area to put my seedlings, then I added one shelf, and just cut the tubes of the existing frame, and put two T... Voilà !

You'll need tube caps for the feet. Elbows (L) are just for aesthetics...

Friday, August 22, 2014

The growing beds


The Eliooo book is quite simple, it use the same IKEA Trofast storage boxes for almost all their setup. They are BPA free, which is always good for growing food. As I bought the net pots at the Prince Edward flower market, they are a bit different than the one you can source on Amazon or Ebay (we don't have Amazon in HK, but Taobao/AliExpress accross the border).
My netpots are larger than the regular 2" described in Eliooo, so I had to buy a different drill hole saw than the recommended that matched my pots.

First you need to place the pots upside down to simulate their position. Keep in mind that you will have plants in them, so don't keep them to close to each other as depending on the crop, they need more or less clearance. 

Drilling the lid is a bit messy as the plastic tend to melt, so you need to drill very slowly. 
When finished with the drill, you need to clean the holes with a cutter blade and remove the melted part.

The final result is close to the design, with only 6 pots per box.

The next step is to drill the bottom part for the water overflow to the next bed. Eliooo said to drill a 14mm hole in the center, and plug a 16mm aquarium tube. It should be sealed enough...


Thursday, August 21, 2014

Why hydroponics ?


We live in Hong Kong, Kowloon side... on the 38th Floor of a tower, and we're lucky to have a balcony. So I thought we could plant some vegetables and herbs for cooking and fun too... but then I realised that I would have to bring soil (heavy), build a structure like these raised growing beds to bring the plants to get some sun, and water them quite often... and this balcony doesn't have water, not electricity...
So, I looked for an alternative where the amount of water would be limited, more or less a closed circuit and also a system that work in a hot and humid environment...

Hydroponics !

But, I can't build a weed grow chamber on my balcony ;) ... so it has to be light, easy to build and easy to disassemble if needed. Then I found the Eliooo book. It describes techniques and setups that can be done using IKEA articles. As IKEA is available in Hong Kong, and pretty cheap, let's give a try.... and if it doesn't work, then my kid can store his toys in the Trofast buckets :)

 It looked simple enough to be build with a limited number of power tools and some free time. For sure, I'll have to adapt to the local IKEA inventory, but these Trofast series are really cheap.

Here is the shopping list:


  1. Trofast Storage box (the water tank) black as the algae will develop in the clear version. IKEA# 902.525.74 Qty: 1
  2. Trofast Storage box (grow beds), green, because it is opaque. IKEA# 201.416.69 Qty: 3
  3. Trofast Lids. IKEA# 701.362.03 Qty: 4 (at least)
  4. Aquarium Water pump (got one with 3m elevation, 430gph) & 16mm tube
  5. Aquarium Air pump & 5mm tube & Air Stone
  6. Net pots


First I bought the bigger version of the tank (501.362.04) but being clear, I got too much light in it, and then algae developed rapidly.
In the book, they also use clear aquarium tubes, which is good for air distribution, but not for water...

The wood plank and shelves are not available in Hong Kong, and I was worried of the wind we can get in Hong Kong during Typhoons, especially on the 38th Floor. So a big wood plank flying on my balcony didn't inspired me much... so I changed my design to a lighter structure made of PVC, as many Hydroponic DIY project.